Wednesday, April 24, 2013

Recent paint projects

It's been a while since I posted about my recent paint projects. Here's some of the goodies that have rolled out of the garage!

This twin sleigh bed is fit for a princess. She's painted with Annie Sloan Chalk Paint in Antoinette. I sealed the paint with soft clear wax, and aged lightly with dark wax. I added a wooden applique to the head board and brushed it with gold gilding wax. There's a touch of the gold on the footboard too. This bed makes me wish I had a little girl!


BEFORE - a yellowish whitewash look


AFTER!!


My husband asked if I would paint his dart board box. So here it is in ASCP's Graphite, with about 3 coats of dark wax to bring the shade closer to black. It had been a cherry color. Sorry I forgot to snap a before shot.


BEFORE

AFTER

This is an old lyre chair I picked up at auction. I gave it a coat of Old White, lots of distressing, and both clear and dark wax. I easily swapped out new fabric for the seat as well. I still have the matching chair to finish - better get on it!


BEFORE

AFTER

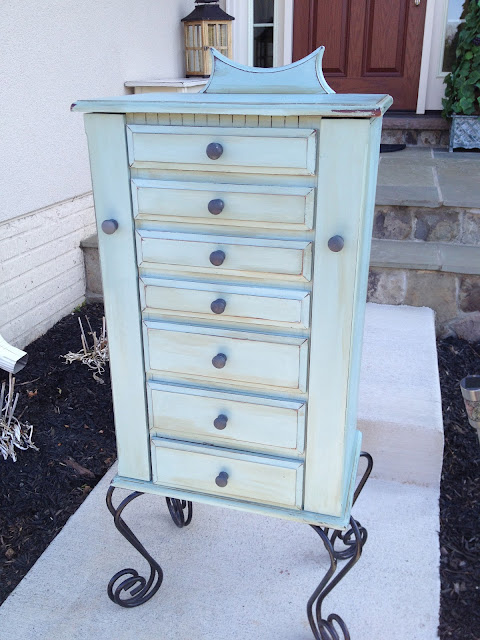
Here's a pretty jewelry armoire who's finish had seen better days. I painted in ASCP's Duck Egg Blue. I painted the knobs in Graphite. This piece turned out so funky with its scrolled legs - loved it!


BEFORE

AFTER

I did a custom toy box for a client who was gifting it to her friend's newborn baby girl, Scarlett. She selected Emile and Versailles - such a pretty color combo! I stenciled the french motif on the sides. 

To create the name, I used a "transfer" technique. First, I printed "Scarlett" using my computer's 
word-processing application onto 2 sheets of 8.5 x 11 paper. Then I taped it together and placed it over transfer paper. I laid them over top the wood, and used a stylis to "trace" the lettering onto the box. Then I filled in the letters with paint! Easy-breezy!

BEFORE


A client purchased a pair of off-the-shelf, unfinished pine cabinets. We painted them in Paris Grey and used dark wax to give them a rustic finish. They are hanging in her mud room over the laundry. 
They look great!

Here's what I have to work on next...


Aren't they amazing! I've gotten the fabric removed so far, but that's it. Time to work!


Monday, April 22, 2013

Open Framed Wall Decor - our April Craft Club project!

I love Craft Club! Why you ask? Two words: wine -and- friends. Craft club is like most other social clubs - there's food, alcoholic beverages and ladies shooting the shit. Craft club is no different than book club, bunco, even some mommy play groups I've been to. It's a group of gals meeting for a purpose that's really not the sole purpose for meeting. Does that make sense?

Sure, we craft. We make stuff with our hands. But, its much more than that. It's time away from the kids. Time away from the laundry, lunch-making and lists of to-do items around the house. It's time for ourselves. Time to be creative. Time to be an adult again. Most of the gals in my group have little kids, and we spend a great deal of time being something for everyone else. Nurse, chef, personal assistant, dog-walker, and boo-book kisser. At Craft Club, I free the inner me. And that me is Hot Pink!

So, after all that bla, bla, bla about the higher calling of Craft Club, let's get down to business and talk about the open frame wall decor we made!

Jackie hosted in her lovely home, and chose a project that was fun and easy to make. Michael's called this an Open Frame Monogram Wreath. You can read the instructions here. Here's what our group did!


We all personalized the project in different ways - some chose to add the silk flowers to their frame like in the Michael's version. Other's painted and hot glued wooden embellishments to frame. Some made flowers from paper. I thought the best part was checking out everyone's gorgeous papers they used to decoupage the wooden monograms. Today's scrapbook paper is just so beautiful! I swear, I am compelled to buy it up and save a stash - just to have it and look at it. It really wouldn't matter if I ever used it, I just love having it!

Our talented artist in the group, Gail, chose not to decoupage her initial, but instead hand-drew designs on it! Is it beautiful!


I loved the paper flowers on Laura's frame!


I opted to not do an intial. Instead I picked up a couple of wooden crosses. I decoupaged each and stacked them - topping the whole thing with a pretty cross I picked up at Hobby Lobby. I thought hot glue would hold this whole thing together, but it didn't work so well. I then decided to use screws through the back to keep them all snug. Here it is hanging on my wall!


I love the rustic, rough nature of the frame, combined with the delicate french toille paper.

Did I say how much I love craft club?