Wednesday, February 20, 2013

Decorating with lambs and sheep

I don't know what is happening to me. Seriously, as I get older, the corniest shit is becoming appealing! Ten years ago I would have NEVER put a rabbit out as decor at Easter. Last year, a stroll through HomeGoods and the bunnies were hopping in my cart!

This is last year's loot. Eggs and bunnies. 

This year I am swooning over lambs. I want a portrait of a baby lamb for Easter! Like Miss Mustard Seed's cow below? Have you seen her cool cow painting, I love it!


Just look at this image...its so beautiful! This would hang in my home all year!

Or this... precious! 


And I probably could be tempted to add a lamb end table to my living room! Hubby might object however. But, how frigging cute are they!!

How else could I bring lambs into my decor without it looking like a baby's nursery?


Pillows! This is cute. There's tons of lamb and sheep fabric for sale online, so if this print doesn't float your boat, find another and make your own cute accessories!


While I haven't learned to knit yet, this little ceramic bowl (for holding yarn) speaks to me. I love the simplicity of it - very nordic folk artsy!


These needle-felted wool lambs are precious and I want a whole flock of them to decorate my fireplace mantel for Easter!!

Prints, posters, and paintings of lambs or sheep - I'd keep them year-round, too!


A sheep rug? This looks so luxurious (its faux). However, with a dog and small boy in the house, its just not practical, right now. And maybe too over-the-top for me.


This I would do! A vintage-style transfer to be used for any type of crafting. I could see printing this on linen and framing it. And its only a dollar on Etsy!

Well, Easter will be here before we know it, so I better get working on it! How will you decorate for Easter?

Sunday, February 17, 2013

Painting a Chandelier

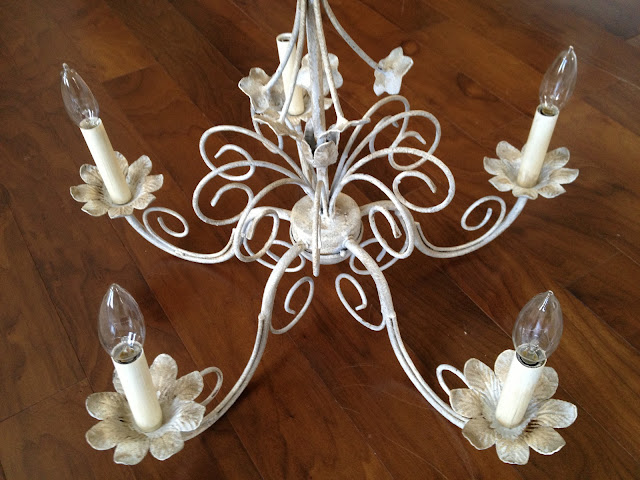
I found this chandelier during a trip to a local consignment shop. It was hanging and I almost didn't notice it. The dark color, the dinginess of it - it faded into the background. It had been there for several months, so I was able to negotiate the price down to $25.


I'd been on the hunt for a chandelier to make over. I wanted one that was delicate, yet not too feminine. I love the blingy, crystal-adorned chandi's out there, but figured my hubby wouldn't be crazy about something so girly. So the simplicity of this one above looked like it could work. And I was hoping that with a paint job and new candle covers, I could give this a weathered look, similar to these below.


I adore similar light fixtures found at places like Pottery Barn and Restoration Hardware. So I was hoping I could get close to the same look, without the price. 

What do you think - did I come close?


I started by painting a base coat of Annie Sloan Chalk Paint in Paris Grey. Then I dry-brushed on Coco followed by Old White. Next I clear waxed the whole thing. Normally I don't think its necessary to wax a light fixture like this, because the paint won't risk getting wet, touched or damaged. But, I wanted to age this with dark wax, and I prefer how it looks when its applied over clear wax, vs. straight on the paint.  I used a cloth to apply the clear wax to the entire thing, wiping it away. Then I used a small brush to apply dark wax more sparingly. Afterwards, I painted and waxed new candle covers. It was only when I started to put new bulbs in did I realize one of the sockets was damaged. So, it will have to be repaired before I can hang my new chandelier. Now to find myself an electrician!


Monday, February 11, 2013

The Joy of a New Color

My latest custom paint project was pure joy! The main reason is because I used a color I haven't tried before and OH. MY. GOD....it made me giddy after just one coat! Take a look. Tell me this transformation doesn't make your heart sing!

BEFORE

My client, Lauren, was in the market for a vintage buffet, and I had spied this beauty from a fellow furniture guy on Facebook. I directed her to his site, and the rest is history. She had me over to take a looksy at the piece in her home, and we decided this baby was going to make a statement!

AFTER

 Painted with Annie Sloan Chalk Paint in Aubusson Blue! (do you hear that, angels are singing)


The inside was done in a 50/50 mix of Old White and Old Ochre. There was a ton of bleed through on the inside, as the original wood was stained but unfinished. So I had to use clear shellac to block the bleeding and used a few more coats of white than I normally would. But, I gave it lots of texture, and really aged the inside. I love that look.


Everything was sealed with soft clear wax and aged with dark wax. Seriously, what doesn't look better with dark wax!


This is the original hardware, believe it or not. I tried to clean the dark stuff that was on each pull with Brasso, but it revealed a dingy silver color under the muck. So, I pulled out some gold gilding paste and gave them all a little bling. 


I have been out in the garage swooning over this buffet. Craig's List has been up on my laptop all day, so I can find a buffet of my own to paint in this color! When the right piece comes along, I'm telling you, I might just redecorate my living room so I can have something big and gorgeous in Aubusson Blue!!

Thursday, February 7, 2013

Valentine's Day Hey Girl Link Up Party

You've probably all seen those posts on Pinterest and Facebook with Ryan Gosling - the Hey Girl posters? They look like this...


And one of my fav's would be this...


Well in honor of Valentine's Day, several bloggers are hosting a link up party, where you create your own fun Hey Girl images! I'm all over that, because I think my honey is way hotter than Ryan Gosling!

So here we go!


Ahhhh, isn't hubby just adorable holding baby Saxon? I love this photo - they both warm my heart!


Hee hee, crystal in the gun cabinet! I crack myself up!


Hubby would say this one is blasphemy!


If you don't hear from me in several days, send help. I may be in deep sh**@% over this picture! (but come on now, he's way hunkier than Ryan right!!!!)


And I had to include a Hey Girl from the other love of my life...my little dancing machine! And you know what, he would dance every slow song at a wedding with me if I asked.

So there ya have it, my contribution to the Hey Girl link party. Don't miss the hosts of this party:
Michelle at Decor and the Dog, Chelsea at Two Twenty One, Bliss at Bliss Ranch, Ashley at Domestic Imperfection and Kelly at View Along the Way.

Sunday, February 3, 2013

Crafting Beaded Hearts for Valentine's Day

Our neighborhood craft club got together last night at my home for our February meeting. We worked on beautiful pearl and beaded wooden hearts.


I found this project on Pinterest, and it was originally done by a stylist named Heather Bullard.


Finding small wooden hearts at craft stores proved to be more challenging than any of us expected, especially with Valentine's Day just around the corner. We were searching for a cut-out with a little lip along the edge. But, we came up empty-handed. So, I reached out to a friend, who edits a woodworking magazine, and she hooked me up with a lady who does crafts with a scroll saw. She made 20 of these babies for us! Thank you Linda Helgerson!!


The STEPS for MAKING A BEADED HEART:
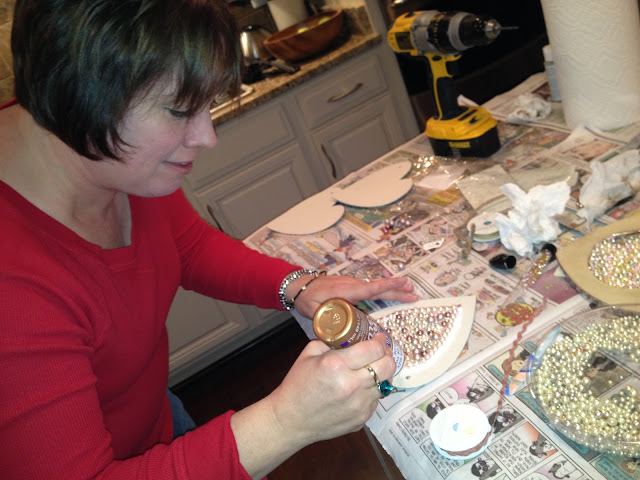
We got started by painting the wood hearts. We used craft latex paint or Annie Sloan Chalk Paint. Then we dark waxed them for some rustic patina. When they dried, we drilled a little hole in the top to thread twine through to hang them later. The next step was to apply white craft paint (I used Elmer's Quick Dry, which dries clear) to the inside of the heart. Then take a handful of pearls or beads, and pat them down onto the glue. You'll want to use a variety of sized beads, so you can insert tiny beads in the spaces between the bigger beads. Let it dry for a good half hour, before you pick it up, or the beads could roll off. If any do fall off, just apply more glue and put it back in. When its dry, thread twine or ribbon through the hole, and if your "heart" desires, add a charm. You'll see I used an antique style key, a bird wing, and a little bird cage (you know I love me some birds). Use any trinkets you have at home that may have come from old jewelry, or you can just buy little charms like these in the jewelry aisle of your local craft store.


Here's the hearts all of us made. You can see some ladies got really creative, by using yarn, ribbon, multi-colored beads, and even wooden hearts that were picture frames!


Don't they look romantic?

It was a really easy craft, and we had fun eating, drinking and crafting!


Laura's hearts were very intricate and beautifully unique!


Here you can see Meredith applying the white glue to the inside of her heart and spreading it around. You want a pretty thick layer of glue in there, so the beads have something to adhere to. Otherwise you might find they don't stick so well if the glue is spread too thinly.


Gail used this cool picture frame and applied the beads to the center where the photo would go. Now she has a nice Valentine's Day decoration for a table top! (love that big brass key!)


Even my son got in on the crafting action!


Natalie used a large flat wooden heart, and to create the lip around the edge, she wrapped the backside and the edges in a pretty script piece of scrapbook paper! Way to find creative solutions!


Heather's string was glam! (and wait until next month - she's hosting our next craft club and you'll be super excited to see what she has in store - it will be pretty and functional for the home!)


Jackie's hearts featured beautiful glass beads!


It was a great evening of friendship and crafting! Happy Valentine's Day everyone!