Saturday, July 28, 2012

WHOO says you gotta throw out that 70's decor stored in your attic?

While I was thrift-store hunting I spied an old piece of wall art that gave me a flash-back of my childhood home's shag carpeting and a pink velour love seat - both which my mother treated like a fragile butterfly. Seriously - my brother and I were not even allowed to sit on that ugly pink thing, or walk on the rust-colored rug. "It was just for looking pretty," she would insist.

And so when I saw this owl wall art, I thought, "who would buy this, it's so outdated." And let's face it, these birds are a bit scary-looking. That's probably why it was priced at $2.00. Heck, I've seen these things at garage sales for a quarter.


And then it hit me - let's turn this into a chalkboard! And that's exactly what I did...


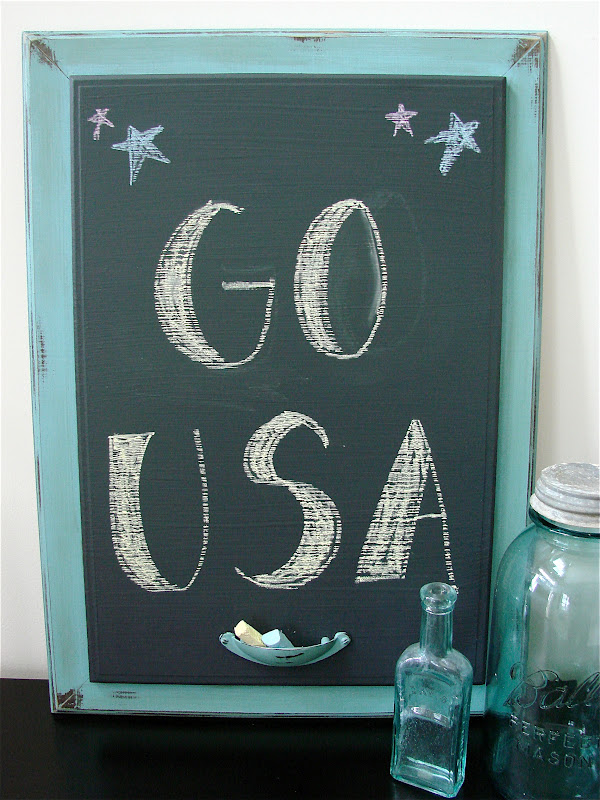
I went to my local Benjamin Moore shop and got a quart of chalkboard paint (this is latex paint). I SHOULD have bought a nylon paintbrush, but instead used one of my natural bristle brushes that I use for my Annie Sloan paint. You can see why I should have used the nylon. Lots of stroke marks on the chalkboard, instead of a nice smooth surface. Oh well - live and learn. I plan to do another chalkboard for my hubby's basement so he can keep track of the winning billiard teams. So, I'll count this attempt as a dry run, and not fret over it too much.

Here's the steps to making this chalk board:

1) I taped off the wood frame (the part in Provence blue now)

2) I painted on 2 coats of the chalkboard paint in the center

3) The next day I removed the blue tape from the frame and then taped the edges of the chalkboard, so I could paint the frame, without getting blue on the black chalkboard surface.

4) I painted the frame with 2 coats of Annie Sloan Chalk Paint in Provence. After it dried, I clear-waxed the frame. Then I lightly distressed with a wet sanding sponge. Finally, I used a little dark wax here and there to give it an aged look.

5) I purchased a cup drawer pull from Lowe's to make the chalk holder you see at the bottom. I painted it with the Provence, and waxed it just like I did on the frame.

6) Then I lined up where I wanted the chalk holder, made little pencil marks on the front, and used a drill to create holes. I pushed the screws through from the back, and used a screwdriver to attach the chalk holder.

And there ya have it! Spooky retro owls turned into a place to root on the American athletes! Or a place to write my grocery list. Or keep track of Saxon's chores. Or just say welcome home.


Thursday, July 19, 2012

Fabric store inspiration!

I drove into Warrenton yesterday to buy paint. Turns out, the place where I get Annie Sloan Chalk Paint no longer carries it. (don't fret, the stockist just changed locations) So, I headed down to Main Street in Old Town Warrenton for a stroll, and was delighted to find so many cute shops. Especially a fabric store that whet my decorating whistle like no other I have ever been to!

The Fabric Emporium drew me in with their window first, and as soon as I walked inside I was hooked. Wow - the displays of high-end furniture and accessories were gorgeous. I want everything in that store! Seriously, everything. And the bolts and bolts of fabric were stunning. The colors, the prints, the textures. Immediately I had visions of new curtains, slipcovers, and upholstered chairs all over my house. No joke - I could have spent hours there. But, alas, I had my 5-year old with me. He was well-behaved thankfully,  but there was too much breakable (aka expensive) stuff in there for a child to refrain from touching for too long.

I spoke with an employee and she gave me permission to take photos and share them on my blog. So here's some eye candy for you!


I love when shops coordinate their furnishings and accessories by color palette. This neutral palette spoke to me! "Buy us, buy us!"


You know I couldn't pass by the decorative painted cabinet and these french chairs! Gosh,I've got to find some chairs like these on Craigs List and add some spicy fabric!


Saxon said, "Mama looks, birds!" I've trained him well.


Love these pillows!


Pretty display of white figurines and blue glass.


Of all the furniture in the place, I fell most in love with this glass-front display cabinet  - it was beautiful!


Glam wallpaper!


Love the mustard colors!


Soft and soothing!


I'll take one of each!


I loved that you could take a swatch of practically anything in the store.


This store has got me thinking that I definitely have to accomplish a few things soon:

1) Learn how to upholster furniture
2) Learn how to sew so I can start making curtains and bedding (duvet covers)

There were so many beautiful fabrics in here - I found myself thinking about them all evening. Now to decide what to work on first!

If you're local to Northern Virginia, and want to peek around this place for yourself, I grabbed a business card. The Fabric Emporium is located at 78 Main Street, Warrenton.

Enjoy!

Thursday, July 12, 2012

Christmas in July - five months to get your holiday crafts and gifts made

I hear the phrase "Christmas in July" every year, but I've never really understood it...is it really celebrated like a holiday? Do people decorate and share gifts this month like they do in December? Or is this a marketing ploy, created by retailers to sell stuff during a slow time of year? I'm not sure where or how Christmas in July got started (but I am willing to bet a quick Google search would provide the answer).

One of the things that Christmas in July does for me is act as a reminder that the December holiday is right around the corner. It signals an urge in me to start buying gifts, while things are on sale! For many, its the time of year to start crafting all of your holiday decor or hand-made presents. If you fall into the latter group, you have 5 months to get cracking!

I'm drawn to making small gifts that show a person's love for something - like gift baskets filled with flavored coffees, mugs, tea towels, and other little baked goodies, like the one below.


This year, I'll probably paint small wooden items in my shabby style and give those as gifts to my mother-in-law and other people I know who will like them. Picture frames come to mind. Like these I did a few months ago - I gave these as teacher gifts.


I'm also very tempted to make some of the items from a new book called Christmas Crafts Scandinavian Style. These nordic-inspired items are so whimsically beautiful - rustic, delicate, simple. I love them! I especially love the dolls. And another thing I love about the projects in this book is that many of them are made in fabrics that are not your typical Christmas colors - like brown, blue, etc. I love using twine and raffia - and these projects use a lot of it!


So, to finish off this post, I thought I'd surf Pinterest for other holiday-inspired gems, to whet your whistle:


Oh goodness, here's a decor project right up my alley - a distressed frame and paper-crafting put together to make an Advent Calendar! LOVE this!


This holiday table display jumped off the screen and shouted, "copy me exactly!!"  Kidding - but not really. I will be on the hunt for a pretty old window like this to use this holiday on my distressed red hall table!


Ooh, imagine crafting a whole bunch of these pretty ornaments using the pages of my old Reader's Digest books! I think I just discovered another use for those babies!


I struggle some years, wanting to hang something on the front door at the holidays that isn't your typical green wreath. It should remind us of the holiday of course, but I prefer it to seasonal, so that when 12/26 rolls around, I don't have to yank it off the door right away. This door hanging of winter mittens is so darn perfect - it "chills me" that I didn't think of it first! And I tend to buy warm, snuggly mittens like its my job, so I'm bound to have a pair I can part with for the door.

I could easily browse Pinterest all day looking at the ingenious craft ideas. Especially the beautiful, classic and cutesy holiday stuff. Couldn't you? Just don't take all day - because remember, it's July - and Santa Clause will be coming down your chimney in a few, short months.

Sunday, July 8, 2012

The contract is signed! Finished basement project.

Hubby has been itching to finish the basement since the day we moved into our house here in Virginia. Back in PA, he had a pretty sweet man-cave, and I know he misses his space. The pool table, watching movies on the big screen. You know... guy stuff in a guy's place. He has some great ideas about how he wants to design the lower level, and it makes me feel great, that he asks for my input. We have agreed that this basement will have a bit of an industrial aesthetic.

In PA, his basement bar was wrapped in aluminum. I thought that was a cool idea, except the material the contractor used was very matte, in fact, when it was all said and done - the bar just looked like it was painted with grey paint. (sorry, I can't find a better photo, but you can see the metal on the back splash below between the two tiers of black countertop)


So, this time around, we're going to do a corrugated metal wrap around the bottom of the bar. We've been talking about this for so long, and I am super excited to see how this bar comes together.

Below is an example of what we have in mind for the base of the bar...


And we've already purchased some industrial light fixtures for over the bar (I might be most excited about these more than any other aspect so far).


Another selection we've made is the bar's 2-tier countertop...it's sile stone, which I understand to be very durable, strong and stain-resistant. Originally, we fell in love with the idea of a poured concrete top, but have learned that a concrete surface needs to be resealed VERY frequently. Not something we are willing to invest time into. So, here's the look we've chose - a pretty white with swirls of grey.


We'll also be removing a wall to expose the stairway, and have decided to use a cable rail system. Here's an example of what we have in mind...


I think the topping on the cake would be to leave the ceiling beam, and ductwork exposed. But, hubby isn't digging that idea. That might be TOO industrial for his taste. I do think he's going to leave the vertical posts open though - and we'll probably paint them a dark color - like black or charcoal.

I'm sure between now and December, we'll change our minds a few times about nearly everything. It's exciting - like building our house all over again! Stay tuned - I plan to post about the whole process as we move along. Feel free to comment with your suggestions!


Saturday, July 7, 2012

Repurposed Book Pages Project

Remember when I posted about a book I was into a while back, called The Repurposed Library? Well, I finally got around to figuring out what I wanted to do with those old Reader's Digest books I picked up dirt cheap at a yard sale.


I went to my old crafting standy-by: decoupage. For those who've never tried to decoupage, it's a method for adhering paper to a surface with a glue-like substance. I've done it many times before, to decorate an armoire, table top, glass vases, etc. The best part - it's so EASY! And really can be done quickly!

With all that said, I'd been staring at a filing cabinet in my office, for quite some time now, that disappoints me. Originally all black, it underwent a makeover prior to my "enlightenment." By that I mean I had no idea what the hell I was doing back when I was taking this on. It was before my introduction to furniture painting. So, I attempted to strip it. And white wash it. It looked like crap. There was still too much grey hue showing through. But, I put it in the office anyway, and decided to live with it.


Fast forward a year later, and you would think I might have painted this by now. I know if I gave it some old white and aging wax, and a little distressing I would love it. But, that means emptying it out and moving it! (some days I don't have that much motivation)

Instead, I decided to decoupage the drawer fronts. That's all anyone really sees anyway, right? (my inner lazy girl is talking here)

Here's what I did...

First, I removed the knobs. Then, I tore pages from the old books. I chose pages with mostly text, but did grab this cover page because of the vintage illustration and because you can read the date it was published, 1960.
And so I wouldn't get glue all over the floor, I grabbed a catalog to work on (sorry Restoration Hardware).


Next I poured Modge Podge into a plastic container and dipped my brush into it. You won't need a lot on your brush. Brush it over the side you want to stick down first. Cover the entire sheet.


Once its covered, place it down, and lightly use your fingers to smooth it into place and get out any air bubbles. Remember to be gentle, as the paper could tear.


Next, cover the front of the page with a layer of Modge Podge. It goes on like white kid's glue, but will dry clear, I promise!


Here you can see it starting to dry. You don't have to wait for it to dry, before moving on to adding more.


I started cutting out more sheets of varying sizes. I chose to trim away the margins so that the text would run to the edges. I layered them vertically and horizontally just to keep it interesting.


When I got to the sheet that would cover the knob hole, I used my scissor to poke a hole though, so it wouldn't dry hard later, and make it more difficult to do this without tearing the paper.


After I added the last sheet, I went over the entire surface with another coat of Modge Podge.


Then I repeated the entire process on the bottom drawer.


When it was all dry, I put the knobs back on and voila!


I really love how it turned out. I used Modge Podge in a matte finish, so it's wouldn't be shiny. It's nice and smooth, too. I still may decide to drag this puppy into the garage some day and give it a proper paint job. But for now, this little change gives me a big happy face!