Tuesday, November 20, 2012

Stacked Burlap Tree Tutorial

Recently I received a catalog to one of my favorite home decor retailers. It included gorgeous holiday items, like it does every holiday season. And every year, I sit, turn the pages, and day-dream about decorating just like the pages. (enter the loud, shrieking sounds of a tractor-trailer braking here) Why - because the stuff in this catalog is salty! I mean, geeze, why does everything have to be so friggin expensive?

When I spied their cute stacked burlap trees, I knew I had to have one. But wait, wouldn't they look much more adorable in a little grove of trees - yes! However, each tree was nearly forty bucks! Damn, to get the three trees I really wanted - I'd have to spend the kind of money I spend on crap like, oh I don't know - groceries!

So I made them...


Here's how you can make your own stacked burlap trees, too.

Materials (all purchased at Michael's craft store):
-Unfinished wooden plaque - I used small oval-shaped pieces - $1.49
-3/16" wooden dowel (one dowel will make 3 12-inch trees) - $.39
-Wood beads with a hole through the middle - about .10 each
-Burlap - I got 2 yards of the red for $9.99 and a roll of the natural for $7.99 (You can get about 3 trees per yard)
-Paint, if you want to paint the wood base and bead

First, I painted the bases and beads white. After they dried, I drilled a small hole in the wood plaques, which became the tree's base. Use a 3/16" drill bit. Then I used a hand-saw to cut the wooden dowels down to 12 inches each. I inserted a dot of hot glue into the hole and inserted the dowel.


Grab your scissors and start cutting! You'll be cutting and stacking strips of burlap that gradually go from about 4 inches in length down to a half inch. There's no exact science here, in fact I never used a tape measure. As usual, I winged it.


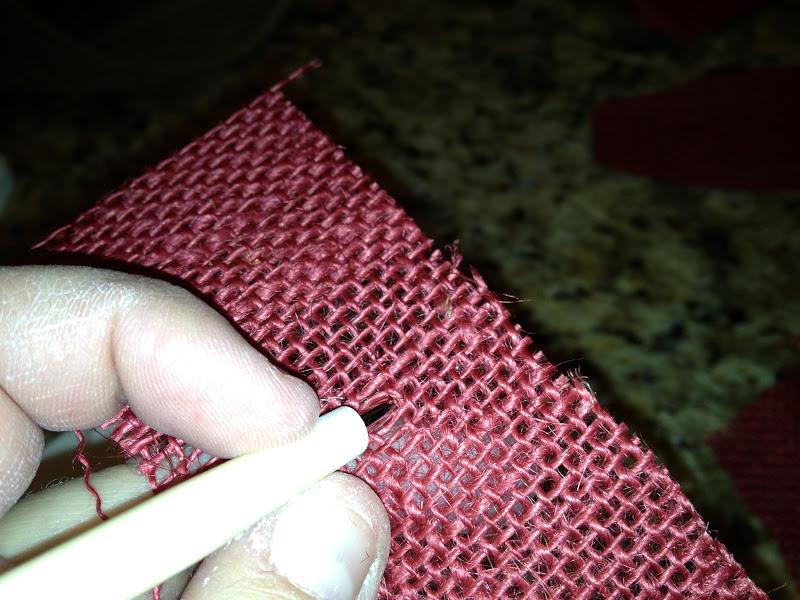
Find something to make a small hole in the center of each piece. The tip of a pencil would work perfectly.

(okay, my finger nails are really not crusty, I swear - this is white paint!)


Slide the hole down over the dowel.


Start stacking your pieces of burlap. You want to turn them so that they are angled differently with each layer.


Get a good base going, and then start working your way up the three by cutting the strips a bit shorter in length. I used the previous layer's length as a guide - I laid the last strip against the burlap and just cut the next row about a half inch smaller.


You will cut a lot of strips! While this is an easy and inexpensive craft, it does take time.


By the time you get to the top, your strips will only be about a half inch in width.
If you feel like the tree isn't graduated enough, take them off and go back. I did that several times!


When there's about a half inch of dowel left, it's time to put on the bead.


Insert a tiny dab of hot glue into the hole.


And slide it on the top.

There ya have it!


I couldn't be happier with how they turned out. They look exactly like the pricey-retailer ones. Next I want to find white burlap and make a few more. Enjoy making your trees!

Sunday, November 4, 2012

Busy painting for a show


I signed up to be a vendor at my son's school on December 1st. So, I've been furiously painting in the garage to get ready. I want to have a few large pieces on hand to show my custom work, but I also have been working on smaller ticket items, so I can recoup my registration/table fee. Here's some images of the stuff happening in the garage - which is getting pretty crowded these days!

Here's a vanity table I started painting in Paris Grey...before and mid-way in the paint process:


It is done now, but I am waiting to show you the final work, until it's mirror is complete. Here's a shot of the mirror as it is now, but I hope to have it started tomorrow. This will be gorgeous!!


This vanity has a matching dresser and full-size bed, with a ornate headboard and footboard. The headboard is complete. See the before and after photos below!


I started a small set of pedestal occasional tables. They were just your typical brown. Now they are Old White, with heavy distressing. On one of them I repeated a french damask stencil in Coco and distressed it down. I am debating if I want to do this to the other table to make a set. Not sure which would sell better - two of the same, or one like this and one just plain white. What do you think?


I also painted a vintage mirror - I love this - it's really heavy, with a fabulous top! And for being vintage, the mirror glass is in very good shape.


I've also white-washed a few little barn-wood boxes...


And I started painting mini wood trays to make them into cute little black boards. Here's the table of them in progress today, and a finished piece as well.


I thought these would make cute Christmas gifts.

Next on the docket will be pallet-wood signs. We got a shipment of tile not too long ago and it came on a pallet. With my neighbor's help, I dismantled it, saved the wood boards, and began sanding them today. I plan to dry brush them with a combination of grey, white and brown paint, so they look like weathered barn wood. Then I'll transfer or paint words on them, like "Imagine, Faith, Family, etc." I should be able to make about 12 signs.

I've got just under a month to get my hands on more goodies to have at the Gravely show. Very exciting!!