Sunday, May 27, 2012

Memorial Day Weekend Yard Sale Swag

Of all the things I love about living in Haymarket, yard-saling is not one of them. Damn gated communities. Seriously, there's little to no yard-sale activity in this town, because its filled with gated communities. My community doesn't even allow yard-sales. And it seems the others have a once-a-year community-wide sale, and then the remainder of the summer is a yard-sale ghost town.

So, that means I have to hit-up local cities and towns to find a bargain. I spent Friday on Craig's List trying to decide where to go. And since I am not from Virginia, I have to map quest everything to see what kind of drive I am talking about. This is too much work. I like the good 'ole days of driving around town and just discovering endless neon-colored signs pointing me in the right direction. Boo!

At any rate, I was all ready to go at 7 am yesterday, in hubby's truck, with an address for a Fairfax flea market. Then I realized, "crap hubby doesn't have GPS in his truck!" So, I had to get into my SUV. That changed my game-plan. Without an open-bed truck, I wasn't likely to walk away with huge amounts of furniture. So, why drive all the way into Fairfax? I changed gears and decided to try a closer town called Warrentown. I found a few sales on Craig's List. They were a bust. Except for the freebie plastic Transformer action figures Saxon scored for a quarter. On a side note - taking Saxon yard-saling is the easiest shopping trips EVER! He can sit and look at books or the quarter-toy bin and find something that makes him so happy - and literally only cost me a few coins! Gotta love that.

So, we drove into Old Town Warrenton. I hoped to get into their Salvation Army there. It was closed for the weekend. Of course.  Then we just drove aimlessly - looking for the brightly colored intersection signs with arrows. We found one, and jackpot...it led me to a town-home community sale! And here I discovered a lot of great stuff, at equally lovely prices!


A gigundo area rug. It had never been used before (and it really does look brand new). The lady gave it to me for $45. I thought that was a steal, considering how much a rug of this size costs new! I don't think I will keep it in this spot, as I have a french-script rug from Ballard on back-order. But, for now, this rug does the trick.


This was the only furniture I found, but without my hubby's truck it didn't matter anyway. These pieces fit into the back of my SUV with that big ole rug! I love the Asian chest. The lady, who was probably in her 30's told me she bought it at an auction when she was just a teenager. It has some expected wear-and-tear, but otherwise it's in good shape. I don't even think I am going to paint it. The red is awesome! I'll clean up the brass, and see if hubby thinks I should keep it. Otherwise, it will be for sale - so stay tuned! The other two little tables will definitely get paint jobs and be posted for sale soon!


Cool clock, huh? The face is what caught my eye. I'm going to paint the body and distress those great edges, so they show through. It will have so much more oomph!


Birds! Imagine how pretty these will look when the frames are painted Old White and lightly distressed!


This cheese tray is going to make a gorgeous decor piece or terrarium after I am done!


Cute little mirror for a girl's room! It's already painted and pretty!


I have a thing for carved ducks. These decoys are the real deal, too. Not mass-produced from a home-store. They are signed by the carver, and I have to decide if I want to add them to my flock, or find a new home for them.


Slightly rusted, but in otherwise good shape, this aluminum planter box will look pretty when she's all painted up! Wait and see!


Dinged up and scratched Pottery Barn frame waiting on a little paint.


Shadow boxes! Going to get a bright color of paint!


This note board/picture frame will look beautiful in Old White too! (can you tell I am a sucker for the antique white color!)


I couldn't pass up this old peg rack for a dollar! It too will be painted!

So there ya have it, my weekend finds! If you ever want to go yard-saling with me in the Northern Virginia area, email me. Next on my list of adventures is trying out some auctions!

Monday, May 21, 2012

Fabulous Find of the Day!

Sometimes I come across a great deal, bargain or find that I can't help but shout about from the rooftops! You know them - the kind that make you smile just thinking about them. Well, I found one over the weekend at a Christmas Tree Shoppe in York, PA. But, I would bet you might be able to find this at any of the their locations. (For my Virginia friends, there's a location in Richmond.)

This little pillow was just $4.99. Yup - a cute pillow for five bucks! I love that it looks like it was made from an old grain sack, with the script writing, french scrolls and of course, a bird image on the front - the female goldfinch if I am not mistaken (I see this bird in my yard everyday).

I LOVE it. And for the itsy-bitsy sticker price, I was searching through the bin looking for more with different birds on them. Unfortunately, this was the only version. Still - I was happy to take this home!


Tuesday, May 15, 2012

Distressed Mirror Makeovers

I finished a couple of mirror projects - one for a neighbor who wanted a full-length mirror for her daughter's bedroom, and another vintage mirror I plan to sell. (Although looking at it in my entryway tempts me to keep it!)

Here's the vintage mirror sitting on a long entry table. The mirror can be hung or placed on a surface as you see here.  It's painted with two coats of Annie Sloan Chalk Paint in a lovely yellow color called Arles. It's got a bit of dry-painting in Old White, is lightly distressed and has been clear-waxed for protection. I am selling this mirror for $75.00.


The mirror measures just shy of 33" wide by 21" tall. I would guess it had been made with an old wooden window frame, as it is very heavy. You would definitely need to reinforce the wall hardware if you plan to hang it.

And here's a photo of the full-length mirror. My neighbor wanted it to match her daughter's antique white bedroom decor. So this was painted with 2 coats of Old White, with light distressing and sealed with clear wax.


Mirrors are hard to photograph. At least for this inexperienced photographer. I didn't want to get in the picture, since I was wearing my pajamas! I hope my neighbor and her daughter are happy with how this turned out!

Sunday, May 13, 2012

Decorations for Book Club

It was my turn to host book club last night, and my selection was Miss Peregrine's Home for Peculiar Children. If you're not familiar with the title, it's a fictional book in the mystery/fantasy genre. The story goes like this - a teenage boy travels to Wales to learn about his dead grandfather's mysterious past, where he discovers a home for children with special gifts. The thing that really sets this book apart from others is that the story was written around several old black and white photos that are included in the pages of the book. Each photo is about one of the "peculiar children." And peculiar they are indeed!

Here's a book trailer, produced by the book's publisher, for those of you interested in learning more about the book: Miss Peregrine's Home for Peculiar Children

So to set the mood for a discussion about the book, I decided to print creepy black and white photos I found on the internet, and used them to decorate. I put a few under glass domes on my table, along with "planting" a few in topiary domes.


Why on earth is that little boy smoking a cigarette next to a rooster??
And who would pose their toddler on top of an alligator? And tell me those identical twin ladies don't scare the bejesus out of you!! These photos enlist a whole slew of questions that fascinate me!


I love the boxing photo in the middle, with quite the bizarre match-up! I don't think they were in the same weight-class, do you?


To highlight the other photos I had found on the net, I hung them from ribbons inside this great, old frame I found at a yard sale for just four bucks. I love the vintage, aged look of it, and want to hang this in my house somewhere. For now, it did the trick of accenting these photos with an old-house, picked out the attic, vibe.

The discussion of the book was great, and centered on what makes someone peculiar, and if we knew people in our own lives who had special gifts. Several people had known someone who was psychic or could communicate with the dead. Another person had met a real dog whisperer. It was cool!

Monday, May 7, 2012

Decoupage Flower Vase Step-By-Step


I made a couple of decoupage vases the other day, and thought you might be interested in a quickie tutorial - since I bet we all have several of those plain glass vases that come with our flower deliveries.


It had been several years since I decoupaged anything, and I'll warn - if its your first time trying to decoupage, maybe skip using a vase, and try this on a flat surface, like a table-top. The process is the same, no matter what you are decoupaging. The difference is that adhering to a flat surface is a little easier, as you can smooth out the paper. With the curved surfaces of a vase, its a little trickier. But, still easy enough for a beginner (don't let me scare you out of trying this).

So the first thing you want to do is choose the paper you want to use. I used plain old scrap-booking paper.


Then I poured some Mod Podge into a plastic container. Mod Podge is the brand I use - but there's several to choose from at your local craft store. It's very similar in consistency to regular white school glue. You'll need a sponge brush or a regular paint-brush will work too.


Dip your brush into the glue. Not too much, just a small amount until you feel comfortable working with it.


Next take your piece of paper, cut to whatever size you choose, and put the paste on the side you want to stick to the vase. For me it was the white side of the paper. Cover the entire piece with glue, making sure to get even the edges. Don't worry, I worked on the granite counter, and the glue wiped right up with a wet rag.


Put the sheet on the vase and smooth it down onto the glass.


Don't spend too much time positioning for perfection...because you'll want to quickly cover the entire piece you just layed down with a layer of mod podge. Smear it over the whole piece of paper. You'll notice how it now lays and adheres to the glass much better.


Smooth out as many of the wrinkles and air bubbles as you can with your brush or your fingers.


I folded the edges at the bottom of the vase down and pasted them into place too.


Cut your next sheet and repeat the process. For this square-shaped vase, I used 4 sheets and pasted them all on. It was a quick and easy project. For the vase below, it was a bit more time consuming, because I chose to paste small pieces on, using the flowers on this paper.


But, the process was the same: cut the paper to the size and shape I wanted, paste the back-side and put it down on the glass, cover the entire piece of paper with a layer of mod podge, and smooth it out.


The glue will dry clear after a few hours. Obviously, you don't want to get the outside of the vase too wet, or the glue can come loose. And you wouldn't want to stick the flowers to the inside of the vase unless you were only planning on putting in dried flowers or branches that don't need water.

Here's how the vases looked the next morning after drying:

And here they are today - ready to be given to Saxon's teachers for Teacher Appreciation Day. He signed the bottom of each vase with permanent marker, and we made little tags with their names on them.


Sunday, May 6, 2012

DIY Paper Flowers for Teacher Appreciation Week

This week is Teacher Appreciation Week at my son's preschool. They sent home an email last week with suggested items to bring for the teachers and staff each day. Tomorrow is Flower Day. And another day this week is Greeting Card Day.  Students are welcome to purchase these items, or make them by hand. Saxon and I decided to make our own flowers. I was planning on doing some fun tissue paper craft with him. But then two things happened that got in the way - he fells asleep at 6 PM and I realized we have no tissue paper.

So, I searched the net for other flower-related craft projects and found this awesome paper flower tutorial. at A Little Hut. The do-it-yourself project was very simple, if not a bit time-consuming considering I wanted to make 5 of these. However, the process became quite easy after repeating it so many times. And Saxon slept through the whole thing. Oh well - he will sign them in the morning!

Note: I did not use card stock. I used lightweight scrap paper. And I used Elmer's Craft Glue, which nearly dried on contact - so I didn't have to use the clothespins to hold my folds together. I held them with my fingers for a few seconds and they stayed. That's some great glue! The artwork on the bottom is a stamp that I colored in with a pink marker. I used fun, scalloped-edged scissors to cut the green card-stock.

So here's how they turned out...I think we may end up saving these for Greeting Card Day and just buy some flowers in the morning! Clearly, these are not as polished-looking as those stunning red ones from the lady who wrote a book on crafting with paper. But, I think anything that someone attempts to make by hand for another person shows a lot of appreciation, don't you? The teachers deserve more than just a quirky-card made in china and printed in the gazillions. Maybe I should spray them with perfume too!


Friday, May 4, 2012

A french coffee table named after a special friend

You may noticed on the page where I've listed my items for sale that they've all been given a name. Why? I thought it might help me keep track of the pieces I've completed in years to come, when they've all found homes - and - sometimes I can't help but think of someone I know when I discover a piece of furniture.

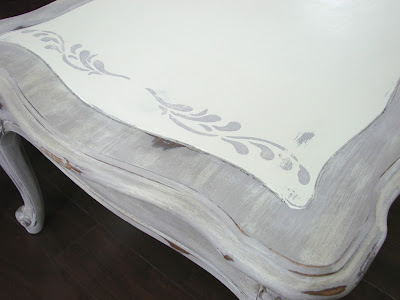
Like this coffee table. When I laid eyes on her, I saw elegance. Those curvey legs, the delicate drawer pull, the beautiful carved shells and finials - they all said, "this old girl may be down, but she's not out." And after a paint job, her vintage glory shines. And so she is named after one of my very dear friends - a woman who is a tremendous fighter, when the odds have been against her - and a true class act. She is Ann, and so this table has been named, The Annie.

Here's her before photo and several images from various angles to admire her...


The entire piece was painted with Annie Sloan chalk paint in Paloma - a grey/taupe color with a hint of lavender. It's a beautiful French-inspired color that I thought would be perfect for this table. I dry-brushed Old White all around the legs, base and top edges. The top of the table features a damask and vine accent. It's been distressed and the legs, base and edges were aged with dark wax. The top was sealed with clear wax.


Dry brushing with the white paint allowed the paloma to show through.


I painted this in my driveway on a hot day and some of the paint started to crackle. I quickly took it inside, fearing that I had destroyed the paint job. But, once it dried completely, I was in love! The little bit of texture provides so much antique-factor!


I know what you're thinking...so many photos! But, I couldn't stop snapping the camera. There's so many beautiful sides to see. Just like the real Ann, she is named after!


I hope you you like her!