Monday, May 12, 2014

I'm Simply Excited About Simply Said!

Simply what now? I know, many of you probably haven't heard of Simply Said. I hadn't either until recently. But, now that I'm in the know…you can bet you're gonna be as excited as I am after I give you the skinny!

I've signed on with Simply Said, a relatively new company that sells vinyl designs. That means I'll be a consultant selling the stuff!  Take a look at how some people are using the designs in their home:


Talk about fun ways to decorate your kids' rooms! Simply Said offers growth charts, custom name vinyls, fun quotes, and sayings centered around things they love, like sports, animals, etc. The designs offered for nurseries are downright adorable!


 I love, love, love the way these vinyls work with wall galleries. By far, this is my favorite method of decorating with them. In fact, I am working on my own "wallscape." What's a wallscape? (other than a word I just made up and you'll hear me talk about endlessly) Like landscaping that includes plants, flowers, stone, etc in a variety of colors, widths and heights to create a visually pleasing effect, wallscaping is the same thing. You take a variety of elements, like mirrors, frames, canvas-wrapped photos, wooden initials, and any other item that strikes your fancy (right now I'm seeing a lot of nautical-themed items like oars) and put them up on the wall in a grouping. Simply Said vinyl designs are perfect for adding to the grouping. MORE to come on wallscaping - I want to finish my first one and promise to share pics!


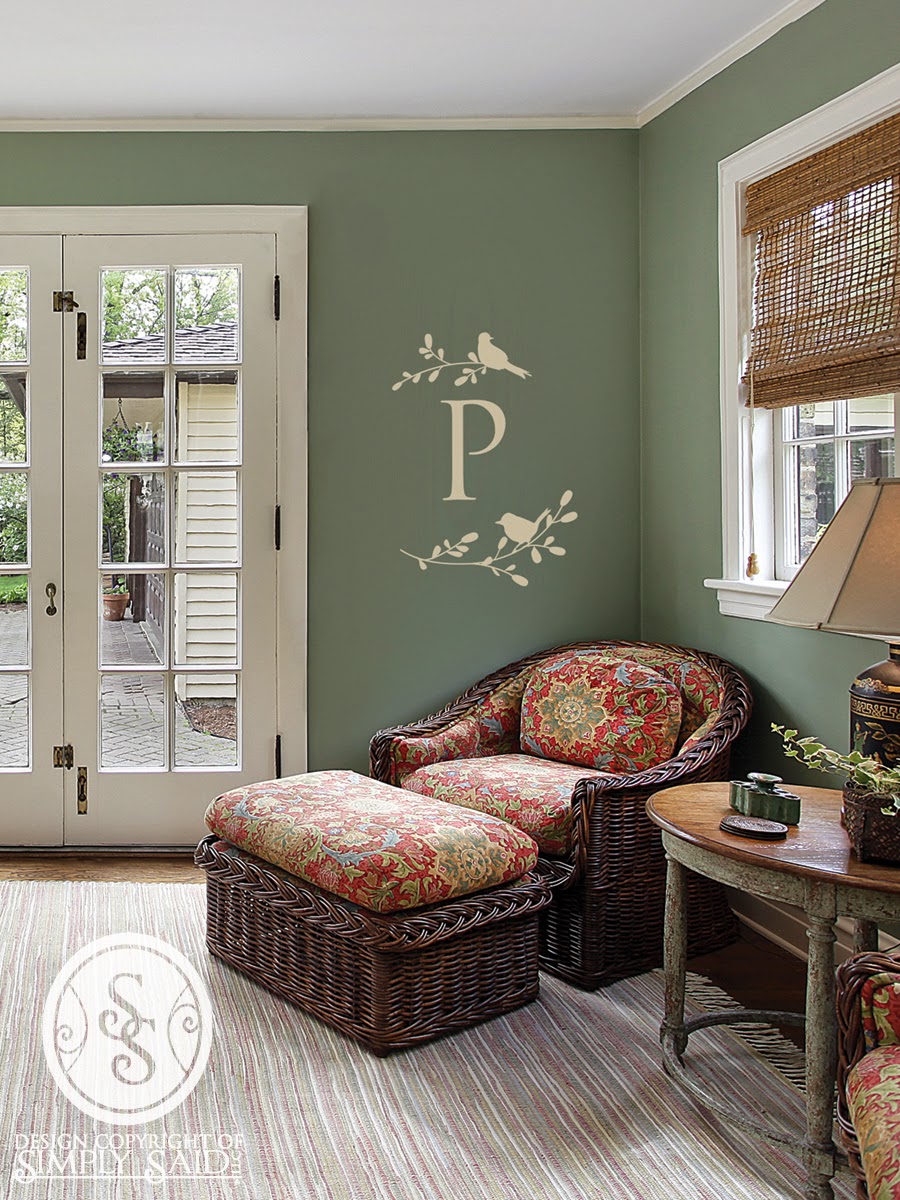
 I like these over a mantel, especially on the spacious walls like this. I also love the designs that feature your own last name, with the year your home was built. 


While I think this design is really pretty, it needs a little something more to anchor it. However, I included it here so you can see how the designs can be customized in the color of your choice to match your decor. There's over 40 colors to choose from!


Ahh that tree! See how its 3 colors? 
You choose the size and colors that work for your space with each design. 


Of course being the bird lady that I am, I adore this one! 


There's plenty of faith-based quotes and designs, too. (where can I get this big beautiful rocking chair??)


This is so elegant! There's so many sayings that fit particular rooms in your house. For example in the bedroom: "Always kiss me goodnight." For the dining room: "Talk much, Sit long, Eat well." For the laundry room: "Wash your worries away." There's something for every room in the house - even the man cave! (think fishing, hunting, camping, gaming-related designs)


They're great on flat walls, but you can put these on glass, textured surfaces, tile, front doors, even your painted furniture! You know that rocks my world - just wait, I will be doing posts to show you how, and will have a few samples for you very soon!  Think about it - no more time-consuming transfers that need to be printed out, transferred over and painted in. No more stencils with soft bleed-through edges. These look like they are painted on, with the crisp edges I could never achieve with a stencil. For anyone who's done transfer or stencils on their furniture, you know this will be a huge time-saver!


Isn't this clever? The wall accents come with the time mechanism, too! Simply Said has lots of artistic elements too - its not just quotes and inspiring sayings.  (see the pic below) They have modern images of trees, floral motifs,   even vinyls that can be written on with chalk or wipe off markers! 


I must do a design on my shower doors. My master bath is the only room in my house I have yet to decorate, and now I have the starting point! You can put any design on glass. There's cute ones for the front of the washer and dryer, too!


There's an entire catalog of spanish designs, too. (and aren't those chairs in front of the bed to die for!)

Here's probably the best part for someone who's tastes change frequently - these come off the wall easily without destroying your paint. So, when you feel like redecorating, its a breeze to take off the old and put up the new!

Putting them up is easy easier than I thought. Here's a quick video to show you how.

You know I love things related to home decor and crafting. And I've always worked in marketing and PR, so this job fulfills a part of me that enjoys blogging, Face-booking and planning parties! You guessed it - I'll be having parties and hoping that my friends will host a party, too. If that sounds like fun to you, drop me a line. 

In the meantime, look forward to my photos and tips on using Simply Said in your home and DIY!
Soon, I will post info about my launch party, and a website where you can see the entire catalog.

Thanks for always following along, and for getting excited with me!


Tuesday, March 25, 2014

The Exquisite Book of Paper Flowers

What woman doesn't love flowers? Seriously. I swoon for gerbera daisies. My hibiscus bushes in full bloom are a source of unmatched joy. And any floral-scented perfume is a gift I love to receive.  So when I was told I'd be handling the publicity for a flower-making craft book, I did a little happy dance around my desk.

The book publishes in two weeks and is called The Exquisite Book of Paper Flowers (Abrams | STC Craft), by an amazing artist named Livia Cetti.


The subtitle, A Guide to Making Unbelievably Realistic Paper Blooms, is no joke. Livia's flowers look breathtakingly liek the real deal. Just look at this centerpiece...


And for my northern virginia and DC friends, just look at these cherry blossoms! With our never-ending winter weather, the trees around the National Park won't be looking this fabulous.


Speaking of DC, author Livia Cetti had the honor of decorating The White House with her realistic tissue paper petals. At the time, Michelle Obama had hoped to bring in hibiscus flowers for a Korean state dinner. But, they were not in season - so the organizers called on Livia to craft the next best thing! How cool, right?

Livia shares her secrets for gorgeous crepe paper blooms. Step-by-step instructions guide the reader through the basics, like bleaching the tissue paper, freehand painting with bleach, painting leaves, working with wire, making pom centers, wrapping stems, and sculpting petals. There's even photos for each step of the process...


Then Livia gets to the good stuff - making flowers!


(This beautiful photo, taken by Addie Juell, makes me want to lean down and drink in what must be a heavenly scent!)

There's projects for 25 of the most popular flowers you can think of...Rose, Dahlia, Jasmine, Sweet Pea, Tiger Lily, Tree Peony, Begonia, and more!


Livia also explains how to combine individual flowers to create arrangements with eye-popping color!
There's an additional 23 projects for arrangements -from garlands and wreaths to wedding flowers, like corsages and cake toppers.


I've invited my craft club to come try their hand at making tissue flowers from The Exquisite Book of Paper Flowers. As soon as the weather starts to feel like Spring around here, I'm setting the date!
I can't wait! This book is so inspiring - the styling is simple and modern, which speaks to my home decor style. Of course, what room doesn't look lovely with gorgeous flowers?

If you want to pick up a copy, here's your link!
Learn more about Livia Cetti here.


Friday, March 14, 2014

Handmade for the Garden - time to craft for the outdoors!

Even though its only 30 degrees outside, I know Spring is knocking on the door. Even some of the trees are sprouting little buds. I wouldn't doubt that green shoots will be out of the ground soon. So, what better time to start crafting items to enhance my outdoor space!

And I have the perfect book to help!

Handmade for the Garden, by Susan Guagliumi. Published by STC Craft | A Melanie Falick Book.


This new book publishes next week and includes 75 do-it-yourself projects for all kinds of pretty and functional backyard goodies - like mosaic pots...


and newspaper pots for starting seeds...


or self-watering planters made from recycled garden hoses...


even a rustic arbor or trellis for your climbing roses and plants!


I especially like this hardware cloth garden basket project - perfect for hauling in my freshly picked tomatoes.


There's a section of the book that even includes projects for making gifts from your garden, like garlic braids.


And what I really love about this how-to book is that it doesn't shy away from the seemingly more challenging DIY - it teaches readers how to experiment with cement & hypertufa to make bowl-shaped flowerpots and box-shaped planters, or pretty stepping stones and decorative pieces like bird-baths. There's also a section on bending and shaping copper to make ornaments for garden stakes or fence posts. And for those readers who prefer the very basic, there's simple projects for stamping and stenciling pots. The point is - there is something for absolutely every garden enthusiast and every level of maker in this book!

The photos by John Gruen are gorgeous, and the writing is clear and precise. And the author, Susan, is a doll. Seriously, what a nice woman! Just check out some pics from the gardens outside her home!


Susan's kitty, Buster! (you know I can't resist sharing a photo of a pretty cat - especially one enjoying a bird bath!)


Lord - I'd love a raised bed like this full of tomatoes!  Guess what - there's a project in the book for making these grapevine coiled tomato towers!

I just love Handmade for the Garden - it combines so many of the things I adore - crafting, gardening, and a general appreciation for the outdoors. Now to choose my first task!


Sunday, March 2, 2014

March is National Craft Month!

It's the second day of March and you would think Spring temps might be settling in. But no. Instead we are preparing for another foot+ of snow tomorrow. So it seems fitting that March is also National Craft Month - because we'll have plenty of indoor time for making stuff!

As a publicist for a craft book publisher, I see plenty of awesome makers, who share their talents with readers. In honor of Craft Month, I'll be sharing thoughts, photos and projects from some of my favorites - and from those I think you'll be most interested in.

First off, I want to share some pics from a book that has the coolest concept - it's called BiblioCraft, and is written by a Rare Books Librarian, from the New York Public Library - Jessica Pigza. Her book includes wonderful craft projects inspired by resources from the library. And the projects were created by some of today's hottest crafters - like Design*Sponge's Grace Bonney, Heather Ross, Anna Bondoc, Natalie Chanin, Liesl Gibson and many more.

(Published by STC Craft | A Melanie Falick Book, an imprint of ABRAMS. Photo credit: Johnny Miller)

Part one of the book teaches you how to use your library - think call numbers and catalog searches. Part two is the meaty project section, and you see the library resources that inspired the creativity.

Take a look...

This marbled fabric pouch was designed by Jodi Kahn, 
and was inspired by an early 19th century marbled endpaper.


This throw blanket was designed by Natalie Chanin, 
and was inspired by a book of Alabama's natural history and poetry.


These adorable animal votive holders were designed by Grace Bonney, and were inspired by a book called Historia Animalium, that features artwork of animals as they appeared four centuries ago.


These pillows were designed by the author, Jessica Pigza, and were inspired by handmade sheets of paper that included the animals as watermarks.


All of the projects in BiblioCraft include complete instructions, so you can make them, too. And check out your local library - its probably just brimming with goodies to inspire your next project - perfect for when you're home-bound in a snow storm!

You can learn more about BiblioCraft here.
Check out the author here.
Check out the publisher here.
Buy the book here.

Monday, February 17, 2014

A new craft room!


If you're like me, you have an unused room in your house that becomes the dumping ground for all things that don't have a place. Storage center, filing cabinet, winter coat closet - these are all apt descriptions of how that room was being used. My husband and I both agreed it should become something functional - and would be my space. (since hubby just got a pretty sweet man cave in the basement)

What did I decide to do with it? Make a craft room of course. Truth be told, I really wanted a room to wrap presents - with one of those handy wall racks for hanging rolls of colorful paper. And I wanted a counter height table for wrapping, so I wouldn't spend one more Christmas even hunched over the bed, wrapping gifts with an aching back. 

I had a vision in my head of what I wanted, the color scheme, etc. It's a small room, so it didn't take more than about a week and a trip to Home Depot to make a reality.


This is probably my favorite part of the room - this pegboard wall with the wrapping supplies. We simply bought two pieces of pegboard and drilled them onto the wall.


I made this craft table and it was super easy! I bought two cube shelves, which form the sides of the table. They sell these at Home Depot - they are 36" wide and the same exact width of the hollow door that formed the top of the table (also purchased from Home Depot). We used a saw and cut the door down to a good size, so that I could easily walk around the table with plenty of space. I painted and stenciled the unfinished door, and attached it to the cube shelves with Liquid Nails adhesive.


I had an old brown wooden book shelf, and just painted it with Annie Sloan chalk paint in Paris Grey. The yellow is just sheets of scrap book paper decoupaged on the back. 


A grey linen-wrapped memo board holds items of inspiration, and the white shelves on the left house paint. Furniture painting will not happen in this room, thus big cans are still stored in the garage.


My french chair makeover has found its home! It's been sitting for a year in my living room, but the grey and yellow are perfect for this room. I shoved a grey-topped IKEA desk into the closet (and took the doors off). Now I have a great place to surf Pinterest!


Isn't this rhino fun? I found him at HomeGoods, and new he would make a great addition. And I can hang my apron over his horn!


Now you can see the sewing machine, notions and gift bags all shoved down in the bottom!


I've had a lot of questions about these frames. They came from HomeGoods. But man, they would be easy to make. They're just grey-washed boards glued together. The white is foam core, with a small little piece of plastic covering the photos, with screws holding the images in place!


My wonderful neighbor Tara Sutherland took these family photos. What fun!

So there you have it - my new craft room. So far, I've made Valentine's day keychains in this room, and wrapped a couple of gifts. But, I'm awaiting a craft kit in the mail and will work on it in this space too. More photos to come!


Why aren't you painting anymore?

I know what you are thinking. A blog post from Twig and Twine Nest? Yes, after 8 months I am writing again, and this might just be the cause for all of our recent snow! Ha. Okay, that's the last time I will speak of the evil white stuff again.

Anyway - I have missed blogging, crafting, painting, etc. I took some time off from it all to focus on other things -like my family. And myself. You see, I kind of got carried away with my little side business. And that's what it was supposed to be - a fun sort of hobby, that I could do when I wasn't working my book job, or taking care of hearth and home. 

Instead, I dove in head first. My hobby got a name, its own business cards, a blog (a full-time job in itself), and a Facebook page. It started to grow and breathe and consume me. I invested in training, books, and countless hours of YouTube tutorials to hone my craft. When I wasn't learning, I was painting. In a garage that was either 80 degrees or eight. 

And let's not get started on the search for furniture - hours at auction, or driving from one thrift shop to another for a deal. Hours in bed at night searching Craig's List. Taking my husband's truck and begging neighbors to help me lift my haul. 

Soon I was painting furniture to sell, and taking commissions. At any given time, I had half a garage full of stuff waiting for its turn. The cars had to sleep in the driveway. It irritated my husband. The gym became an afterthought and I gained (more) weight. But, I loved the satisfaction of a finished piece of furniture - the transformation. So, all else took a back seat. Laundry piled up. The house wasn't its usual spotless abode. Saxon had to fight for my attention. And my husband was last in line. 

And right when it was becoming clear to me that something had to give, the paint business started changing for me. Selling was becoming difficult. The local area seemed to explode with interest in repurposing furniture, and suddenly everyone was dipping their brushes into the collective paint can. I lost commissions to lower priced painters. My inventory wouldn't budge (unless I slashed prices like Crazy Bob). Tax time came and when my accountant told me I took a loss on my "hobby," I was devastated. Here, I thought I was helping my family earn additional income, while doing something I loved. Instead I SPENT money. Ouch, that was a tough realization. 

Soon, I decided to hang up my paint apron. I sold off my inventory. I stopped taking commissions. And while it gave me more time to focus on other priorities, I missed it. I felt ashamed, like a quitter. And my blog, which once gave me delight, became a source of sadness. It hurt to look at previous posts. And as each month passed, I felt guilt for ignoring it. I still do.

But, a lot of good has come from my time away. My jeans dropped 5 sizes. Saxon is reading like an "above grade level" champ, and I like to think its due in some small part to the time I spend with him and open book. My marriage is stronger than ever. 

I've had a lot of time to reflect on myself. It's obvious I am an all or nothing kind of person. Twig and Twine was my baby, and come hell or high water, I was going to see her to the prom. Yet, I skipped right through the joys of infancy. That business model might work for some, but it wasn't right for me, or my family.

In the past eight months, I've still enjoyed decorating my home. I have painted a couple of things, too. For myself and a friend - without the pressure making a profit or turning it around in time for the next project. I've enjoyed trying new crafts, cooking healthy meals, teaching fitness classes, walking my dog, playing board games and other activities. I've found a better way of living I think. One that gives me flexibility, while still including so many things I love.

I've learned one person can only have so many jobs. My plate is still full. But at least now I have time for a blog post! So when someone asks me, "Why aren't you painting anymore?" I just say that its not the right time in my life for painting as a business. But painting will certainly remain a hobby. Until the next thing comes along to absorb me!

Monday, June 17, 2013

A Nelson Matter Dresser Makeover

I picked up this dresser and mirror several months ago at an auction.


As you can see, it was a mess. The lovely crackled finish would have been nice to leave as is, excerpt there were places on the top, front and sides that had huge areas of damage. The top had cup rings, the front looked like a tire tread over the paint, and the side had business cards stuck to the surface!

After inspecting the inside when I got it home, I discovered this medallion in a drawer.


It belongs to The Nelson Matter Furniture Company, which had been established in 1844 in Grand Rapids, Michigan. After a little research online, I discovered this company went out of business in about 1910. So, you can see that this is an old piece of furniture! And that would explain its sold wood, dovetailed construction, as well as the state of the mirror, which is quite cloudy. However, it certainly doesn't deter from the beauty of the piece, but gives it more character in my opinion. I loved the bail pulls, even though it was missing one. I loved the keyholes, the swiveling mirror and gorgeous legs. I loved it at first sight, and waited through 4 hours of bidding to get it!

After giving it a quick clean-up with mineral spirits, I decided to paint this with Annie Sloan Chalk Paint. I used Graphite with dark wax, as well as Paris Grey with clear wax (the two-tone look is so hot right now). And while I had hoped to find a drawer pull to match the existing ones, my search came up empty-handed. So, I ordered 6 new solid brass rosette bail pulls, that were a close match.

And here she is...


I love painting dressers - especially old ones. They always please me to no end with their dramatic transformations! I hope this beauty finds a well-deserved new home!