Sunday, January 11, 2015

Christmas decorations!

This is starting to sound like a broken record - it's been a while since my last blog post. I was doing good there for a while with writing and keeping the content coming. But, life gets busy, and I get lazy. And my back went kerplunk in October (that's a whole other story)! So let's just move on and try to get back into the swing of things!

I can't let January end without a few shots of my home at the holidays. I LOVE Christmas decorations - LOVE them. And even though I was struggling big time between November and December, I still managed to get the house done - with a lot of help from my mother in law and son. Thank you to both of them - as well as my father in law and neighbor, Hudson, who helped set up my big tree and huff all the storage bins up from the basement! His wife, Tara, also strung the lights on my outside tree! You guys rock!

So here's some of my favorites and new items this year...

A countdown design from Simply Said. Saxon loved moving the magnet each day! 

Another Simply Said item - the "No Place Like Home for the Holidays" distressed board, next to a lantern from Pottery Barn.

I purchased this photo of Arlington National Cemetery locally, from photographer Gail Vitikacs.


The lights on these garlands worked last season, but this season not a one would light. Go figure. I was too incapacitated to really care, let alone go buy new ones. So, up they went. And honestly, I still love how they look.

My bestie, Sharon, came to visit after the holiday and brought me this sweet pillow.  I love it!


I found the doe at Anthropologie this summer and added a red bow.

Scored two of these adorable polar bears at Pottery Barn after Christmas last year. Half price baby!


A neighbor was selling this Willow House chandelier. I grabbed it and added the candles and greenery.

Here's my tree. I love this tree. She's so pretty!

There's still presents under the tree because my hubby comes home next week from Afghanistan. He'll be home for a few weeks and we'll be celebrating Christmas!


The last two years I have gone to Great Gatherings for ornaments. The day after Christmas they mark them down half price! Here's some of my fav's!


This one came from The Empty Nest in Warrenton last year. Still one of my absolute favorites!


The paper flowers and butterfly were from Cracker Barrel this year.


This Summer hubby gave me this Eiffel Tower ornament!


The bedding was purchased from Stein Mart this season- wow, it was super cheap! I think the King quilt was only $39!!

It's all staying up until after Damon comes home and we celebrate. Plus, I really need his help to take it all down and put it away. Since he was away when we put it all up, I think it will be nice to play holiday music while we take it down. I know that's backwards, but I want him to feel some of the "special," too.

Stay tuned for what's next in our great room - it's got me a little "grey!" And not in a sad way, either. 


Tuesday, October 21, 2014

Our Man Cave Renovation - time to redecorate!

As many of you already know, we recently had a plumbing fail in our basement, and my hubby's newly finished man cave suffered a big loss. All the flooring had to be ripped out, the drywall had to be cut out, and a lot of the electronics and decor got wet and damaged.

Thus, we're now in the process of getting ready for a major renovation. With that in mind, its fun to take your mind off the sucky part of this experience, by imagining how we might redecorate the space.

Coincidentally, I was just invited to participate in Man Crates Gifts for Men's "Man Cave Makeover" campaign. Man Crates is an online source for sending your guy a gift he'll laugh at, brag about, and probably grunt over while breaking it open with its included crow bar. Yup, they come with a crow bar! Highly covetable, these wooden crates come filled with things guys want - beer, beef jerky, grilling gadgets, barware, sweat-inducing spicy snacks, survival gear (in case of an zombie apololypse of course), golf goodies, and products for the poker player or old-school video gamer.

Man Crates asked me how I would decorate a Man Cave, and I have to say I would do exactly what the hubster and I did the first go-around - with an industrial aesthetic. You can check out this previous post that shows a lot of the items we used in our basement, like Edison light fixtures, stainless steel, etc.

For the purposes of this post, I'm thinking pie-in-the-sky, money is no object...and making a list of what I would do, if I could, without a budget or a hubby to stop the madness!

First, I love exposed brick...so I'd give one wall that treatment.


Next, there'd be a lot of exposed ductwork, beams and track lighting with grey walls. Black beams though (which is exactly what's in our man-cave now)


I'd choose a comfy grey upholstered couch, and pair it with some reclaimed wood pieces, like a coffee table, console or media center.


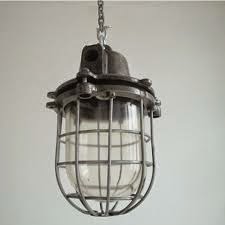
There is no lack of cool industrial light fixtures available on the market today. I love cage lights, vintage barn lights, and even big mercury glass globes. Oh how to choose!?!


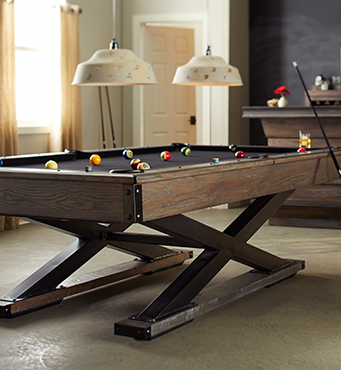
And of course, any self-respecting man-cave needs a game table - especially a pool table. Check out this baby (from Great Gatherings)...oak hardwood, mortise and tenon construction, decorative metal bolts...I think I can hear my husband moaning with pleasure already!


A bar is another given for a man-cave, and these bar stools make my heart go pitter-patter.


As for artwork, I'd do vintage maps...especially city maps, like this...


So there ya have it, my vision for an ideal man-cave - a place where he can enjoy solitude with his Xbox, or a Sunday in front of the big screen with his buddies!

Thank you Man Crates for the invitation to participate in your campaign.

Now back to dealing with the insurance company!


Thursday, October 16, 2014

Halloween decorating and making your own spell book

I hate scary movies, but I love creepy Halloween decorations. Go figure. 

So every season my son and I dig out the skeletons, skulls, and other creepy-crawlies to liven up the front yard. I really wanted to do something different this year - less cheesy. Less cheap scare, more Fall, with a touch of the hair-raising, in a subtle way. But, it didn't happen. I had hoped to have a hoard of time and money to shop for new things. Neither happened. So, we went with our usual. 


The only part of the outdoors I am really happy with are the crows. Why? Because the pizza delivery guy told me that this one scared the hell out of him! I don't blame him. (Have you seen Hitchcok's The Birds??)

Here's a couple of the indoor vignettes...


The only real fun I had with decorating for the 31st has been the "mad-scientist lab," as I like to call it. I saw this idea on Pinterest and more or less just stole it!


To think I bought these apothecary jars for a baby shower I hosted last year! This one now holds my son's rubber snake!


These lovely cloches were scored at Great Gatherings during a 75% off sale! I got such a deal on them! And doesn't the skull look creepy in there!


I found these jar labels online. Gotta love free printables! I can't remember where I found these. If you Google search images for Halloween printables, you're bound to find them!


Another snake in a jar, with little mice scampering over things on the table!  I wish I had a realistic looking frog! How can a household with a 7-year old boy not have a fake frog??


My only real project was making this spell book. This was also an idea found online - and easily recreated! Below are the simple steps (so simple you don't really need steps, but I'll list them for you all who insist on complete tutorials)!


I bought this big dictionary at a local used bookstore. Only $1.00!! And fortunately for me, it already had a black board cover. Look for a thick book - it doesn't matter if its old, you can make it look old.

1) Find a big, thick book, with black board cover. If you can't get a black cover, paint your cover black.

2) I used a wet sponge to moisten all the edges of the pages. Let it dry. 

3) Design two sheets to look like an old spell book. Again, there's a lot of wording examples on the net. I found both of these "recipes" on the net. I used an old-fashioned gothic style font and designed using Adobe InDesign. I downloaded the free skull and snake images from The Graphics Fairy. 

4) Next, open to the center of the book. Spray each side with spray-mount glue and stick down your newly designed sheets.

5) Then, I antiqued the page edges and two new sheets with Annie Sloan's dark wax. I just brushed a small amount on with a paint brush and it looks beautifully old!

6) I took my wet sponge again and went over the edges of the pages and started to roll them with my fingers. They dried slightly rolled up and look great!

7) Last, I grabbed an old black ribbon, cut a forked end, and just draped it across the open book, and tucked the other end under the book. I didn't even attach it, as I don't expect anyone will be touching this evil-looking thing! (insert bewitching laugh here)

And that's it - the hardest part was driving 30 minutes to the used book store!

Now that the house is all decked for Halloween, I can't wait to take it all down and start putting up my Christmas things! Damn, two more weeks until Trick-or-Treat.


Wednesday, September 24, 2014

Decorating Bottles for a Vendor Event

This past weekend I did my first vendor event with my Simply said business. It was at Haymarket Day, in down-town Haymarket, Virginia, on an incredibly gorgeous day. As you would expect on a sunny, warm Saturday afternoon, the masses were out. Who doesn't love a parade, beer garden, and bands?  And over 250 venders?!!  I do, I do!

I had the great fortune to be placed right next to the kettle corn truck. Oh yeah - a mile of people waiting in line to get their grub on, all the while eyeing up my Simply Said goods! They'd walk right on over after getting their giant bag-o-popcorn, and say, over and over again, "What's Simply Said?"


 By person #1,345 I had gotten pretty good with my response. And a jar full of registration slips proves it. But seriously, I had a lot of very interested folks tell me they want to host a party. I even took a few orders right on the spot. And I sold about a dozen of my fun, little decorated bottles.


I made the bottles in an attempt to try and make up some of my investment for the booth. Normally I wouldn't spend that kind of money on a vendor event, but, I know I have to grow my biz outside of my lovely community, and figured this was the biggest show I could afford to do. Especially if these bottles sold like the kettle corn did!

I made thirty of them. I did not sell thirty, however. The Christmas ones didn't move. Guess when its sunny and 80-some degrees outside no one is thinking about Dec. 25.  They did love the candy corn bottles, though!! (kettle corn, candy corn…this is starting to sound like a sponsored post)


I should have made all of them with the white/orange/yellow combo of colors. But, I wanted to give people variety! So, I made these, too…


It's okay, I have two more vendor events coming this holiday season, so I hope that the festive designs will be in demand then.

So, I've had a lot of questions on how to make these lovelies, so here ya go:

1) Drink a lot of wine! Or better yet, host a Simply Said party with me, and let your guests drink all the wine. (psst…drunk ladies like to buy stuff)  Kidding. Kind of.

2) Once you have some empty bottles, soak them to loosen the adhesive on the labels. I soaked for about an hour, then scraped the labels off. I got all remaining goo off of them with mineral spirits. Rubbed it on, and wiped them clean.

3) I bought cans of Valspar gloss spray paint at Walmart. I took the bottle outside and set them upright on a flattened cardboard box. I sprayed them each with three coats.

HINTS FOR SPRAY-PAINTING
-hold the can a few inches away from the bottle at all times
-spray using even strokes back and forth
-do not expect to have complete coverage on the first coat - its better to have very light coats
-if you spray in one spot for too long, you will get a drips
-go around the bottle in a circle - spray from 12 o'clock, 3, 6 and 9 o'clock
-let each coat dry before adding a second or third coat
-when overlapping layers of color (for instance in the candy corn bottle) spray with a fine light mist at the point where they overlap for seamless blending
-spray on warm sunny days and a bottle dries in a matter of minutes
-let paint cure for at least a day before attempting to decorate with vinyl designs or accessories

4) After I sprayed the bottles, I let them cure for 2 days in the garage. Then I applied Simply Said vinyl designs to each. All that entails is rubbing and removing paper!

5) Next I embellished with ornaments, ribbon, jewelry and other pretty little trinkets. 

6) For a decorative touch to make these bottles look like vases, I go into the woods, fetch a bunch of twigs and skinny branches, and spray-paint them as well. Then I pop them into the tops of the bottles. Done!

The grocery store gave me a few wine boxes and they made it so easy for traveling with the bottles. No clinking around, or worrying about dinged paint jobs.

So there ya have it, instructions for decorating your own wine bottles. Drink and be merry my friends! See ya at the next show!