Tuesday, May 28, 2013

The basement renovation is nearly complete!

The last two months have been consumed with all things "basement!" Between dealing with contractors and an overseas husband worried about his man-cave, this basement might have given me a couple of gray hairs! (which no one will ever see thanks to my hair stylist)

Hubby left for Africa about a week into construction, and since then, it's been a very bumpy road getting to completion. As you all know if you've ever tackled a big project, there's always things that just don't go correctly. Without getting into all those pain in the ass details, I thought I'd skip right to the fun stuff - photos!!

Here's a visual tour of what's been going on downstairs...


These are a few items I've picked up to hang here and there. Plus this cool vintage locker-style cabinet that I gave to hubby as an early Father's Day gift. Since we're going for an industrial vibe, it's all about the metal, wire and old down there! I'm having so much fun searching for decor!


The power room is one of my favorite parts of the basement because of the copper sink and the light fixtures.

 They are the large Edison wall sconces from Restoration Hardware. I picked up the mirror at a thrift store for a couple of bucks and painted it with Annie Sloan Chalk Paint in Graphite, and several coats of dark wax. There's a touch of brass colored wax around the edges too.


Wow, I didn't realize how dirty this sink is! Darn contractors washing their hands in our new sink! Grrr...


How cool is this piece of burled wood - now being used as a trash can!


This little front room will be used for playing video games primarily. The walls and carpet are a light grey. And the doors, beam, support pole, as well as the panel door were plainted black.


I will be painting the railing in ASCP's Graphite. I just started taping it off today.


All of the appliances are installed behind the bar. The stone counter-top color is called Lyra. Custom cabinets were made and finished in black.


I love this deep bar sink!


This is probably hubby's favorite part of the bar - the keg-o-rator!  


I like the wire pendants hanging over the bar, and on the side wall.


The bar is wrapped in corrugated metal. Applying this is easy to do - just buy sheets from Lowe's or Home Depot (they're very thin). Tack it to your wood frame, and then finish it off with metal strips that are screwed into the wood frame. Just be careful, this stuff is really sharp when its cut!


This wall will be getting a ledge under the 3 pendants, where guests can sit on bar stools and wait for their turn at the pool table! Or try their luck at the slot machine!


The back entrance was tiled, and the doors were painted black.


Here's the view as you walk in the back door. The beams and poles were left exposed and painted black. The floor will be completed next week, with a wood flooring that looks like weathered barn wood.


Here's a clock I picked up at HomeGoods that we have to hang. It's a rusty metal - love it!


 Some Restoration Hardware pillows moved from the living room down to the basement.


And here's evidence that the basement is already functioning as it was intended! hee hee We may not have furniture yet, but we have beer!

Wednesday, April 24, 2013

Recent paint projects

It's been a while since I posted about my recent paint projects. Here's some of the goodies that have rolled out of the garage!

This twin sleigh bed is fit for a princess. She's painted with Annie Sloan Chalk Paint in Antoinette. I sealed the paint with soft clear wax, and aged lightly with dark wax. I added a wooden applique to the head board and brushed it with gold gilding wax. There's a touch of the gold on the footboard too. This bed makes me wish I had a little girl!


BEFORE - a yellowish whitewash look


AFTER!!


My husband asked if I would paint his dart board box. So here it is in ASCP's Graphite, with about 3 coats of dark wax to bring the shade closer to black. It had been a cherry color. Sorry I forgot to snap a before shot.


BEFORE

AFTER

This is an old lyre chair I picked up at auction. I gave it a coat of Old White, lots of distressing, and both clear and dark wax. I easily swapped out new fabric for the seat as well. I still have the matching chair to finish - better get on it!


BEFORE

AFTER

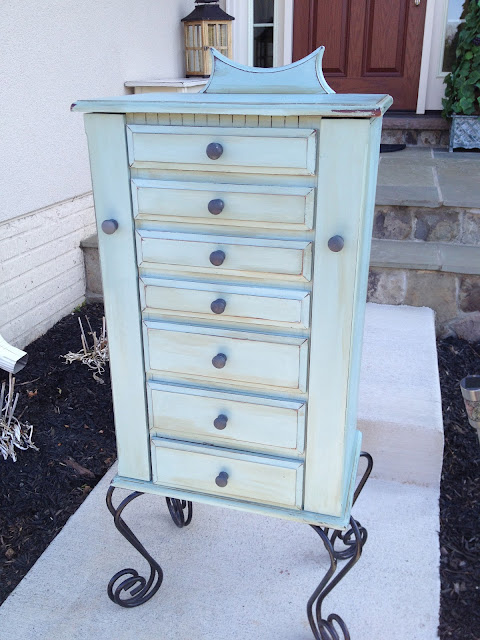
Here's a pretty jewelry armoire who's finish had seen better days. I painted in ASCP's Duck Egg Blue. I painted the knobs in Graphite. This piece turned out so funky with its scrolled legs - loved it!


BEFORE

AFTER

I did a custom toy box for a client who was gifting it to her friend's newborn baby girl, Scarlett. She selected Emile and Versailles - such a pretty color combo! I stenciled the french motif on the sides. 

To create the name, I used a "transfer" technique. First, I printed "Scarlett" using my computer's 
word-processing application onto 2 sheets of 8.5 x 11 paper. Then I taped it together and placed it over transfer paper. I laid them over top the wood, and used a stylis to "trace" the lettering onto the box. Then I filled in the letters with paint! Easy-breezy!

BEFORE


A client purchased a pair of off-the-shelf, unfinished pine cabinets. We painted them in Paris Grey and used dark wax to give them a rustic finish. They are hanging in her mud room over the laundry. 
They look great!

Here's what I have to work on next...


Aren't they amazing! I've gotten the fabric removed so far, but that's it. Time to work!


Monday, April 22, 2013

Open Framed Wall Decor - our April Craft Club project!

I love Craft Club! Why you ask? Two words: wine -and- friends. Craft club is like most other social clubs - there's food, alcoholic beverages and ladies shooting the shit. Craft club is no different than book club, bunco, even some mommy play groups I've been to. It's a group of gals meeting for a purpose that's really not the sole purpose for meeting. Does that make sense?

Sure, we craft. We make stuff with our hands. But, its much more than that. It's time away from the kids. Time away from the laundry, lunch-making and lists of to-do items around the house. It's time for ourselves. Time to be creative. Time to be an adult again. Most of the gals in my group have little kids, and we spend a great deal of time being something for everyone else. Nurse, chef, personal assistant, dog-walker, and boo-book kisser. At Craft Club, I free the inner me. And that me is Hot Pink!

So, after all that bla, bla, bla about the higher calling of Craft Club, let's get down to business and talk about the open frame wall decor we made!

Jackie hosted in her lovely home, and chose a project that was fun and easy to make. Michael's called this an Open Frame Monogram Wreath. You can read the instructions here. Here's what our group did!


We all personalized the project in different ways - some chose to add the silk flowers to their frame like in the Michael's version. Other's painted and hot glued wooden embellishments to frame. Some made flowers from paper. I thought the best part was checking out everyone's gorgeous papers they used to decoupage the wooden monograms. Today's scrapbook paper is just so beautiful! I swear, I am compelled to buy it up and save a stash - just to have it and look at it. It really wouldn't matter if I ever used it, I just love having it!

Our talented artist in the group, Gail, chose not to decoupage her initial, but instead hand-drew designs on it! Is it beautiful!


I loved the paper flowers on Laura's frame!


I opted to not do an intial. Instead I picked up a couple of wooden crosses. I decoupaged each and stacked them - topping the whole thing with a pretty cross I picked up at Hobby Lobby. I thought hot glue would hold this whole thing together, but it didn't work so well. I then decided to use screws through the back to keep them all snug. Here it is hanging on my wall!


I love the rustic, rough nature of the frame, combined with the delicate french toille paper.

Did I say how much I love craft club?

Sunday, March 17, 2013

The decoupaged document dresser

Say that three times fast! (I love a good tongue-twister)

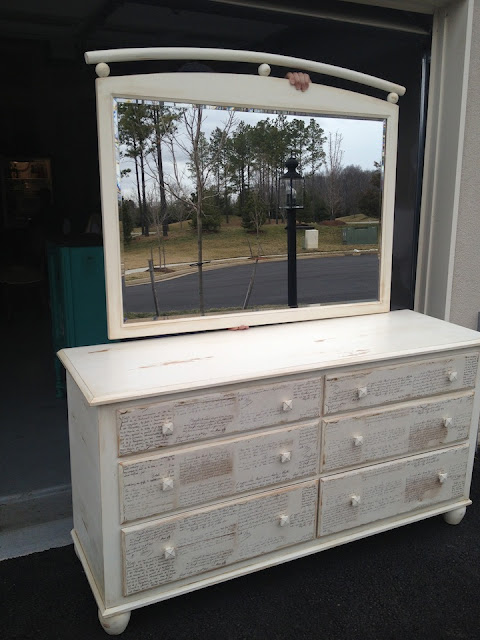
Here's one of my latest paint projects - an Ethan Allen dresser with matching mirror. It started off a golden honey color, and now looks like this:


I painted the whole thing in Old White. It's heavily distressed and sealed with clear wax. Dark wax was added for aging. A while back I ordered several rolls of document wrapping paper from Ballard Designs, and this piece was begging for something different. A little Mod Podge and the drawer fronts got a cool new look. And to make it even more unique, I pulled out the BBQ lighter and scorched the edges of each piece of paper. (my house stunk for days!)


What's next? I've got a couple of unfinished wall cabinets to do for a client, and a girly toy box to personalize with stencils for another. My own stash includes two twin beds to finish, and two antique chairs to paint and reupholster! I seriously gotta buckle down and get in the garage! Later friends!

Sunday, March 10, 2013

Spending the weekend in a yurt...a what?

This weekend we went to the beautiful Shenandoah Valley and stayed in a yurt at a resort called Shenandoah Crossing. Don't worry, I didn't know what a yurt was either. And when someone described it as a tee-pee, I was a bit more than nervous. I don't camp. I don't sleep under the stars. And I don't think I would have survived as an early American Indian. But I went anyway.

And I LOVED it!! Bring on the yurts! If this was a tee-pee, it was the Taj Mahal of tee-pees. It had indoor plumbing, air-conditioning and heat, cable TV (even though it wasn't working due to a recent storm), and a full kitchen. Technically it even had two bedrooms, but we'll talk about the reality of that later.

Anyhooo - look how cool this is...


The yurts were circular wood-framed structures covered in canvas-like tarps. This is the view from the road out front.

Here's the view looking off the yurt's rear patio (where there was a Weber and outdoor sink)...


We looked out over Lake Izac. Honestly, I could have sat out there for days enjoying the serenity and peacefulness. My cell phone didn't get any coverage in this remote area, so I unplugged from Facebook, my blog, and the entire electronic world for a day and a half. I thought it would be awful, but ya know what? It was bliss.

So let's go inside the yurt!


 My favorite decorative element of the yurt had to be this fabulous copper vessel sink, with the rustic pump-style faucet. Seriously - I want one!


All of the furniture in the place was made in the twig style (even though I want to say these were not authentic hand-carved twig and branch pieces - they felt fake). But, they definitely added an outdoorsy ambiance you would expect in a yurt!


This tiny structure really utilized space well. They tucked all kinds of functional things in small spaces, like this closet. Even the kitchen was wonderfully efficient!


And stainless appliances! Contempo juxtaposed with rustic - loved it!


Notice the walls there next to the gas fireplace? In the summer you can pull back the tarps for instant windows!


And to keep it further well-ventilated, there was a huge ceiling fan at the peak of the yurt, under a glass dome. You could look up while in bed and see the stars - so cool!

Speaking of the sleeping arrangements - they bring me to the downside to yurt-living - no privacy. While there was 2 bedrooms, the spaces were only divided by a piece of wood. Imagine office cubbies that are separated by partitions that don't go all the way to the ceiling and are open at the top - this was the same concept.


I could hear my son rolling in his bed! And while we watched a movie that evening, we could hear the TV coming from the neighboring yurt! Speak above a whisper and I'd bet the vacationers could repeat your conversation.

However, this was just for the weekend. It's not like I plan to tear down my house and erect a yurt in the yard. (not that HOA would ever go for that!) Next year, we might go back and see if we can rent this tree house...


See it tucked in there? A frigging ginormous tree house!! Tell me that experience wouldn't be good for a blog post!