Thursday, August 30, 2012

French Chair Makeover

A few months ago I found a french chair. A french chair! Yippee, yay, and all those other adolescent-sounding words of joy raced through my head as I laid eyes on it and the incredible $15 thrift store price tag. I snatched it up and proceeded home to begin the transformation.

Here's said chair in it's BEFORE state...


You can probably see why I didn't want to just plunk her down in my living room as is. First, this fabric was worn, and second, it smelled like a grandma. Plus these colors were drab. I knew these gorgeous arms and legs could be spectacular with a paint job.

So, hubby and I got to tearing off the dated fabric, welting and pulled lots of staples. You can read more about that process in my earlier post here.

But, here's what she looked like underneath...


You can see the little horse hairs sticking out through the seat - a sign of a well-made chair!

Next I painted the wood with Annie Sloan Chalk Paint in Coco for the base and Old Ochre, with dark wax.  More about that here, as well.


As I was nearly completion of the paint I had been out looking at fabrics. I ordered 2 Robert Allen home decor fabrics in a black and red combo. I chose these bold colors because I wanted something very geometric and the room is a palette of grays with red accents.


This one arrived...


The other did not. I had waited nearly 3 weeks to find out the black floral motif was discontinued. Grrr!

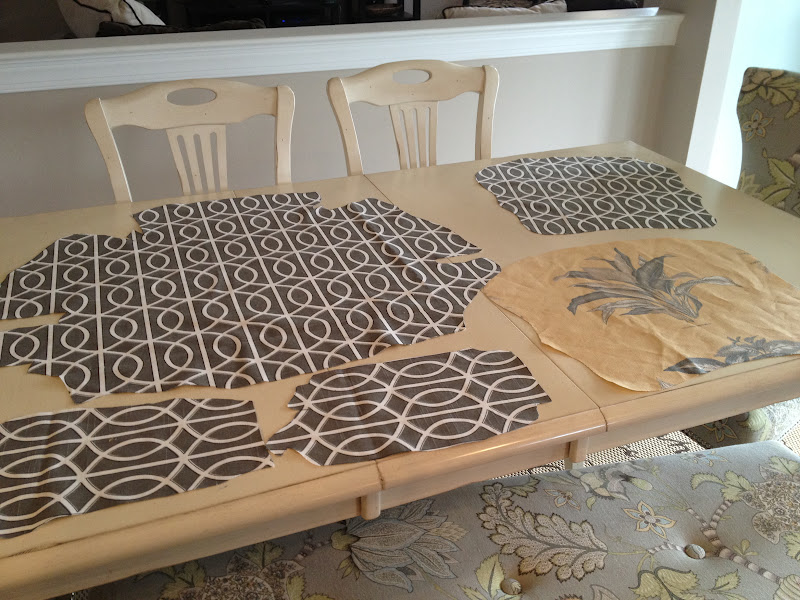
So, I visited the Fabric Emporium in Warrenton, Virginia and changed gears on the red/black vision in my head. When I saw the yellow and grey, I knew this was it! Went home and traced the pieces of old fabric I had torn off.


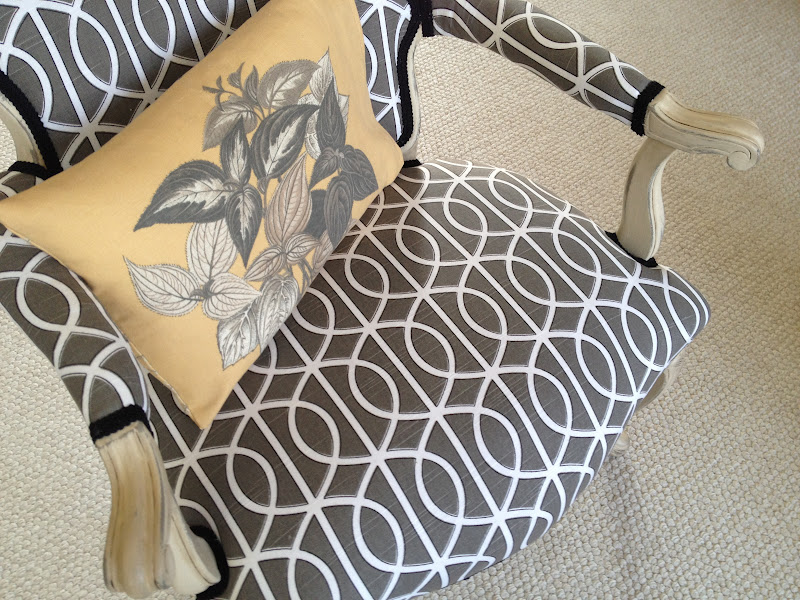
Then I started the staple process. Let's just say I need to invest in a pneumatic staple gun, as there must be an easier way to do this. With the electric stapler I purchased, I had to use all my weight to push the gun down onto the wood, in order to get the staples to sit flush. Most went in crooked, if they went in at all. I was at my wit's end at times. I would work for an hour and then walk away disgusted. So many staples were yanked and tossed in the trash. But, finally, I finished, and felt amazed at how good it looked. All it needed was a bit of braided trim to hide the staples and voila! Fresh, feminine and contemporary - I love how it turned out!


I made this little pillow slip-cover with leftover fabric by sewing together 3 sides of fabric and sliding in a pillow insert. 


Tips I'd give to anyone else who wants to tackle a chair makeover (since this was my first and I learned lessons the hard way):

1) Allow an extra 1"-2" of fabric along the edges of your templates (the old fabric you wrapped off). If you trace right along the edges you might find it's too tight to staple on properly. I had to redo the seat as the first piece I cut was too small. How that can be possible I'll never know. Just take my word for it.

2) Make sure you buy enough trim. I seriously underestimated how much I needed. I went home with 4 yards, and when I went back, they were out! Had to go to another store in another town. Lost a day there.

3) Use a pneumatic staple gun. Seriously. Why work so hard? 

4) Blow a hair dryer over the trim to evaporate any glue gun strings. But, don't hold in one spot too long, or you'll loosen the bond.

And of course, enjoy your handiwork! I am!

Saturday, August 25, 2012

Occasional Table Gets Gilding Wax Treatment

I've been dying to try gold gilding wax, and when my neighbor (thanks Karen!) gave me a pretty little occasional table, I had the perfect piece. With it's carved column legs, it begged for some bling!

I wish I had stopped to take a BEFORE photo, but like so often, I get all caught up in painting, and forget. So, imagine this piece in a dark brown. Trust me, it looked really different!

It's painted with Annie Sloan Chalk Paint in Old Ochre. With all of the crevices and detail, I knew this piece would look beautiful with dark wax. And of course the gilding wax went into the little carved details on each leg. Gosh - she looks so pretty!


Wednesday, August 22, 2012

Even the hairless cats like it!

Today I delivered a newly painted dining set to a client. It was an old pedestal 4-seat table that she inherited from her grandmother. The pieces had been stored in a basement for quite some time, but they were about to get a new lease on life.

Here's what the set used to look like...


Here's what it looks like now...


I used Annie Sloan Chalk Paint in French Linen for the chairs and table base. The table top and some accents were done with Old White. I used several layers of clear wax for the table top, and buffed it nice and smooth. The chairs each were clear waxed and I used a little dark wax here and there for some aging. And as you can see in the pics, I distressed the corners, edges and spindly areas.

The client loved them, and while I was there dropping off, her grandmother arrived. That's right - the original owner of the set. She approved too. But, the best part had to be when the client's three hairless Sphynx cats started investigating. They hopped up on the chairs and rubbed their bald little heads all over them! It was great!


Now if I could just learn how to knit them a coat!

Monday, August 13, 2012

Graphite French Country Tables

I have someone interested in having a dining set painted in Graphite, the Annie Sloan chalk paint color that isn't quite black, but a lovely charcoal color. The shade deepens to nearly black with layers of dark wax. I have been dying to try it out, and gave it a go with two french country tables I acquired recently.

These Bombay coffee table and end tables were in need of repair - both had damaged surfaces, but were otherwise in great, sturdy condition. (sorry, I forgot to take a photo of the coffee table in the BEFORE stage)


First, I sanded down the table tops to remove most of the damage and smooth out the surface. This convinced me that I really need to invest in an electric sander! Using sanding blocks and manually doing it was a you-know-what! And I was doing this in my garage, on a friggin 90 degree day, when the humidity was high enough to drown a duck in its own sweat! No fun.

Next, I painted each with a coat of ASCP in Old Ochre - a sort of antique white color. Then I painted the tops in Graphite. It went on a bit blueish. A very pretty color indeed! I made sure to paint in every direction - left to right, up and down - purposely giving it texture. After it dried, I began waxing it with several layers of dark wax. Each time it got a little darker - and more beautiful - because the wax settled into all of that texture. The color is spectacular - aged and beautiful! Then I clear waxed the legs. Next I distressed the edges of the tops and just a bit on the bottoms of the legs. I went over all distressed areas of the tops with another layer of dark wax. The bottom distressed areas got clear wax again, and I finished by putting just a tad bit of dark wax on select areas of the legs to age them a bit too.

Here's the finished pieces:


Charlotte can't resist a photo shoot!!


These pieces are for sale: http://twigandtwinenest.blogspot.com/2012/04/items-for-sale.html